Quick start
Start here
The whole first flight, from download to your first timestamped receipt: run it, claim the admin
account, hook up email, add a person and a document, hit Notify, and watch the ack roll in.
There's no database to install and nothing else to download — AckMan is one self-contained
program.
Download a build
Step 1
Grab the build for your platform from the
downloads page and put it in its own folder. AckMan keeps
everything it needs — config and data — right next to the binary.
Run it
Step 2
# Linux / Raspberry Pi
chmod +x ackman-linux-amd64
./ackman-linux-amd64 -listen :8080

# Windows (PowerShell)
.\ackman-windows-x64.exe -listen :8080
On Windows you can also just double-click ackman-windows-x64.exe — a console window
opens with the server log and AckMan keeps running until you close it. In that case it uses the
default port 80, so the addresses below lose the :8080 part.
Why -listen :8080? The default port 80 usually needs admin rights on Linux, so this
sidesteps that while you're kicking the tires — see Installation for the
proper setup.
Claim the admin account
Step 3
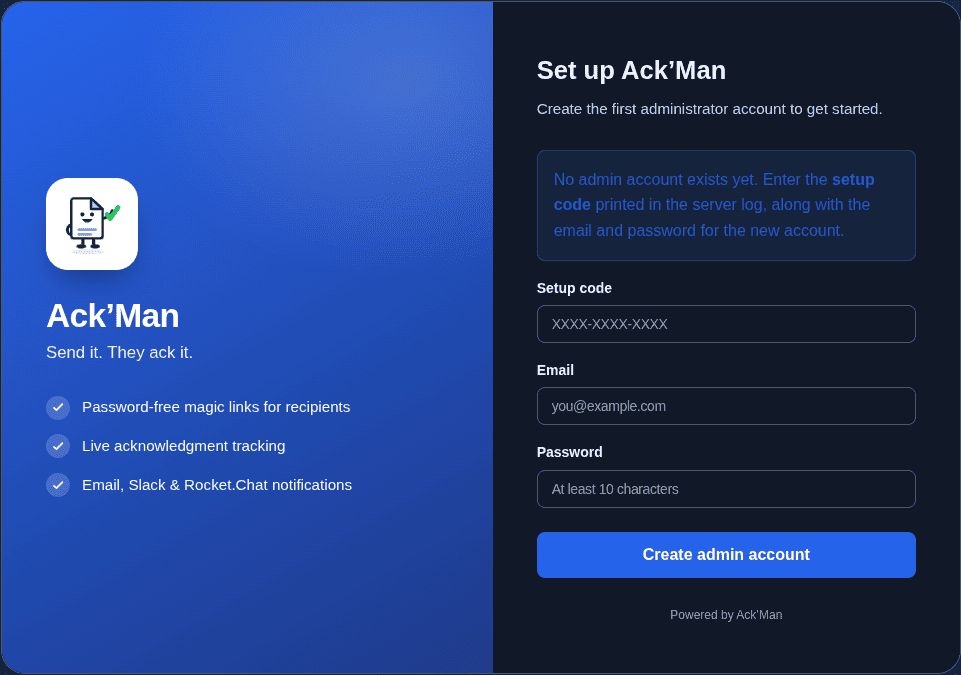
On first run AckMan creates a ./data folder, initializes its SQLite database, and
prints a one-time setup code to the console:
INFO no admin account exists yet — open /admin/login and use this
     setup code to create one  setup_code=XXXX-XXXX-XXXX
Open http://localhost:8080/admin/login, enter the setup code together with an email
address and a password (10+ characters), and you're in. The code works exactly once — it exists so
only someone with access to the server's console can claim a fresh install.
Hook up email delivery
Step 4
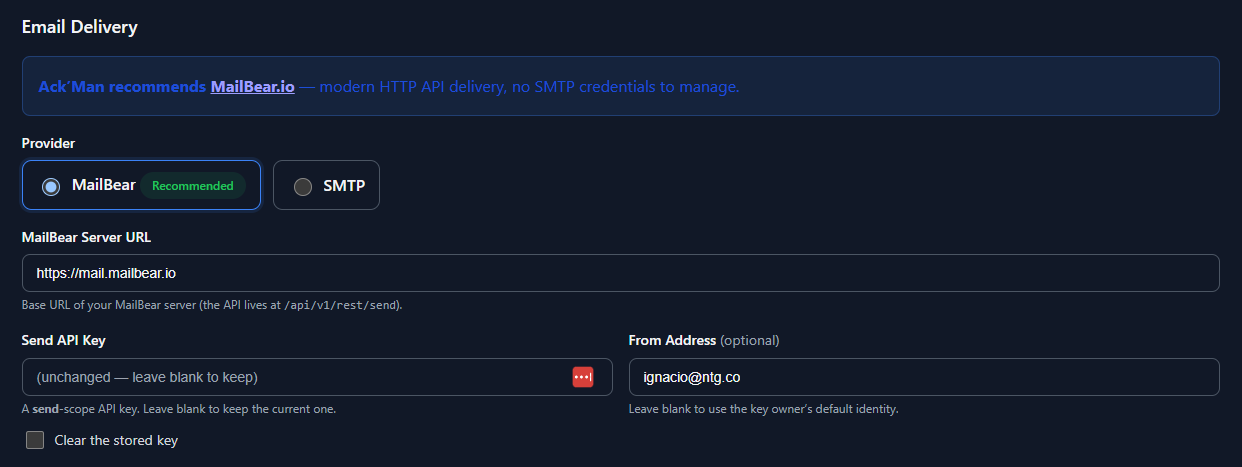
Notifications travel by email — each message carries that person's own magic link — so before
inviting anyone, open Admin → Settings and configure a delivery channel. Save,
and it takes effect immediately; no restart needed. Two options:
-
MailBear (recommended).
MailBear delivers over a simple HTTP API — no
mail-server credentials or TLS handshakes to babysit. All it needs is your MailBear server's
URL and a send-scope API key.
-
SMTP. Classic and fully supported: pick it as the provider and fill in host,
port, credentials, and from-address. If MailBear is selected but not configured, AckMan
quietly falls back to SMTP so existing setups keep working.
Slack and Rocket.Chat webhooks are optional extra channels, not replacements — chat messages
mention the person but deliberately carry a link without their personal token (channels
are shared; see Security). Prefer files over clicking? All of this can go
in the configuration file too.
Add your users
Step 5
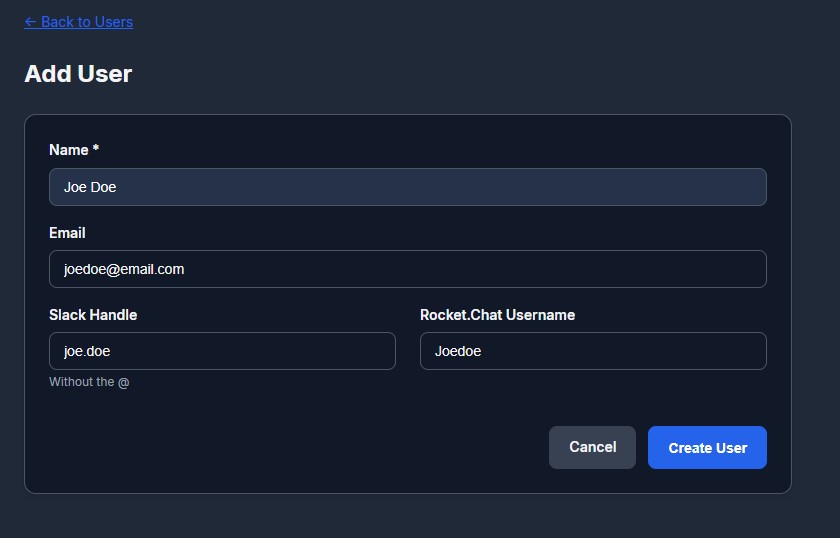
Under Admin → Users → New, add each person with a name and an email address.
Email is technically optional, but it's how personal magic links get delivered. That's all AckMan
needs — your people never register, set passwords, or open accounts; they just click the link that
lands in their inbox. (Using Slack or Rocket.Chat? Fill in the person's handle on their profile
and AckMan will mention them in channel pings.)
Add a document
Step 6
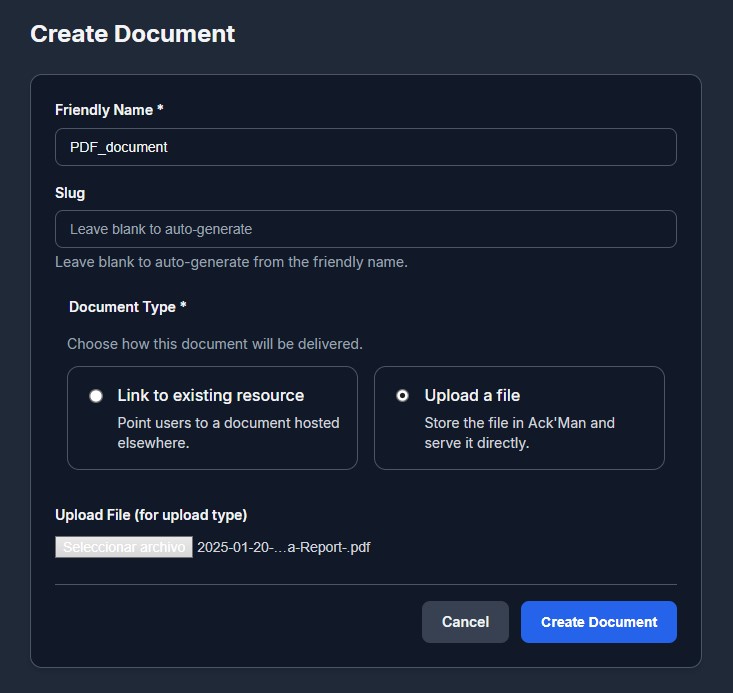
Under Admin → Documents → New, give the document a friendly name and pick its
kind:
-
Uploads. Any file — PDF handbook, slide deck, scanned memo — up to the
configured size limit (50 MB by default). Files are stored inside the data directory and
served only to people holding a valid personal link.
-
External links. A URL the document already lives at:
http(s):// for the web or intranet, file:// /
smb:// for LAN file shares. AckMan still tracks views and acks; it just points
people at the source.
Besides the friendly name (what people see), every document gets a slug — the
short piece of its URL, as in /doc/handbook-v4. Leave the slug blank and AckMan
derives one from the name. You can rename either later: links that were already sent keep working,
because the signed token identifies the document and old URLs redirect to the new slug.
Send your first document
Step 7
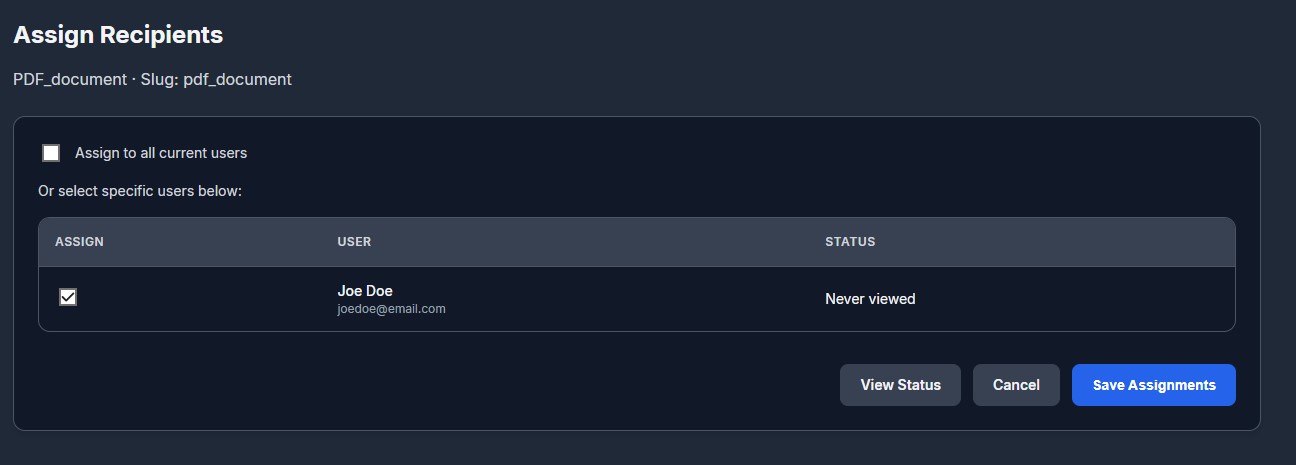
Open the document's Assign page and tick who needs to acknowledge it — the
assignment list is exactly who's on the hook, and who the progress bars count. Then hit
Notify:
- Email sends each person their own tokenized magic link.
-
Slack / Rocket.Chat post a mention with a link to the document page
without a token — chat channels are shared, and a tokenized link would let anyone in
the room ack on the recipient's behalf.
-
Notify again anytime; choose only pending to nudge just the people who
haven't acked yet, without re-pinging everyone else.
Reading the trail
Step 8
You hit Notify — here's the other half of the story. Your people never see an admin panel: their
whole experience is one notification and one button. And this is why AckMan exists — at any moment
you can answer "who read it, who signed off, and when", with receipts.
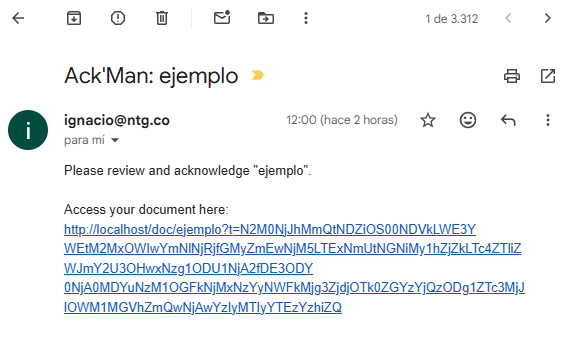
The email
Each assigned person gets a message with the subject Ack'Man: <document name>:
a small card that names the document, asks them to review and acknowledge it, and carries a big
Open Document button holding their personal magic link — with a plain copy-paste
link underneath for stubborn mail clients.
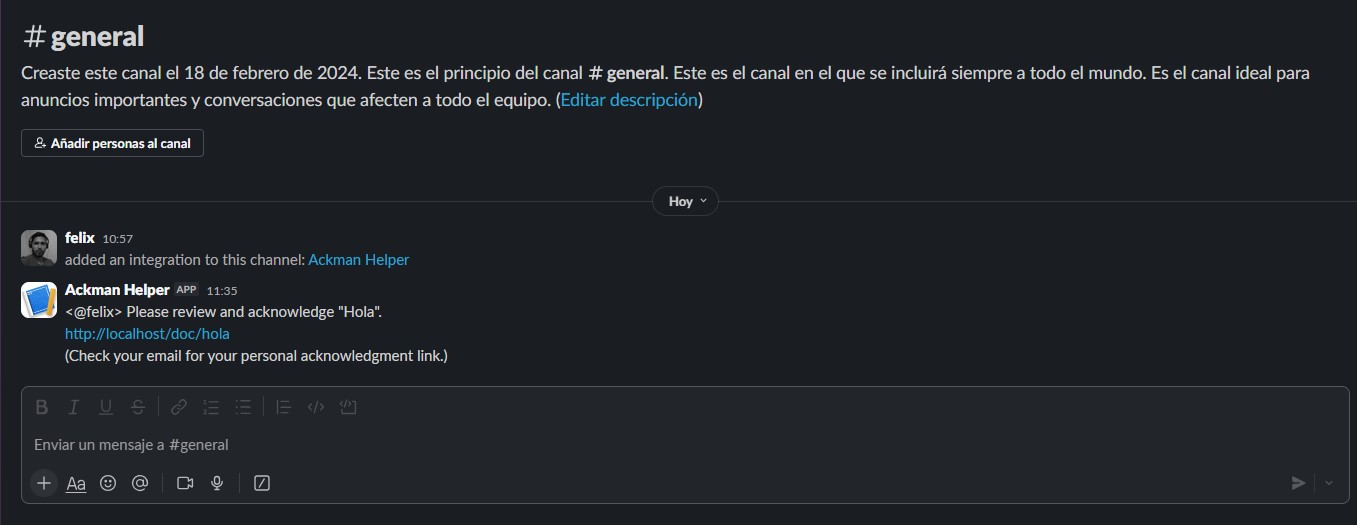
The chat message (Slack / Rocket.Chat)
If a webhook is configured, AckMan also posts to the channel: a mention of the person, the request
to review and acknowledge, and a link to the document page — deliberately
without their personal token, plus a hint to check their email for it. The chat ping is
the nudge; the email is the key.
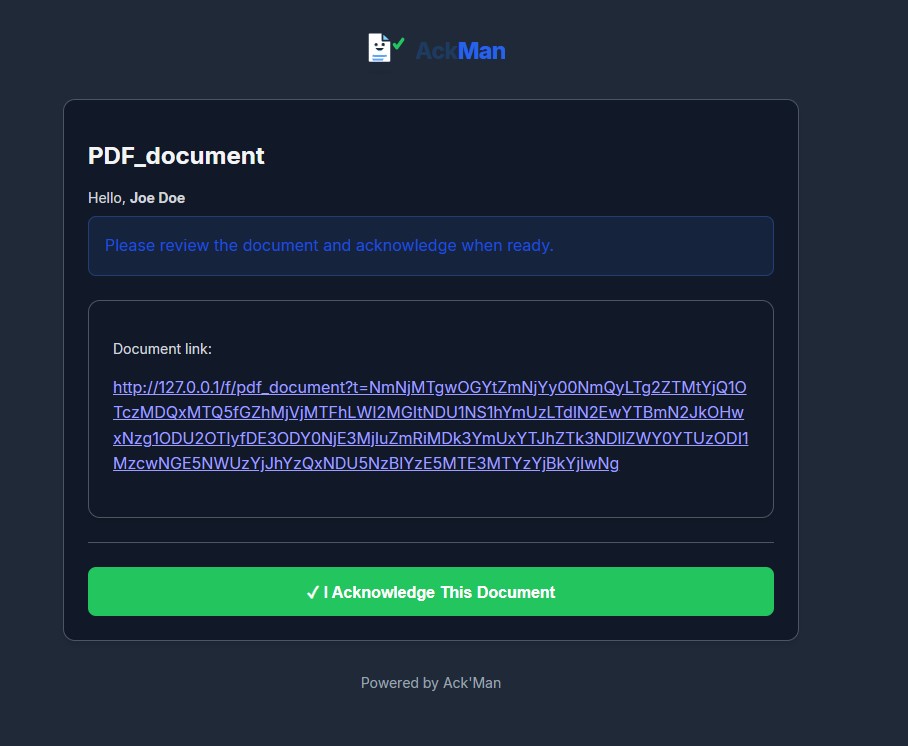
After the click
Opening the personal link records the view and shows the document — uploads render right in the
browser when the file type allows, external links point at the source — along with one big
friendly acknowledge button. One click and they're done: they see a confirmation with the recorded
time.
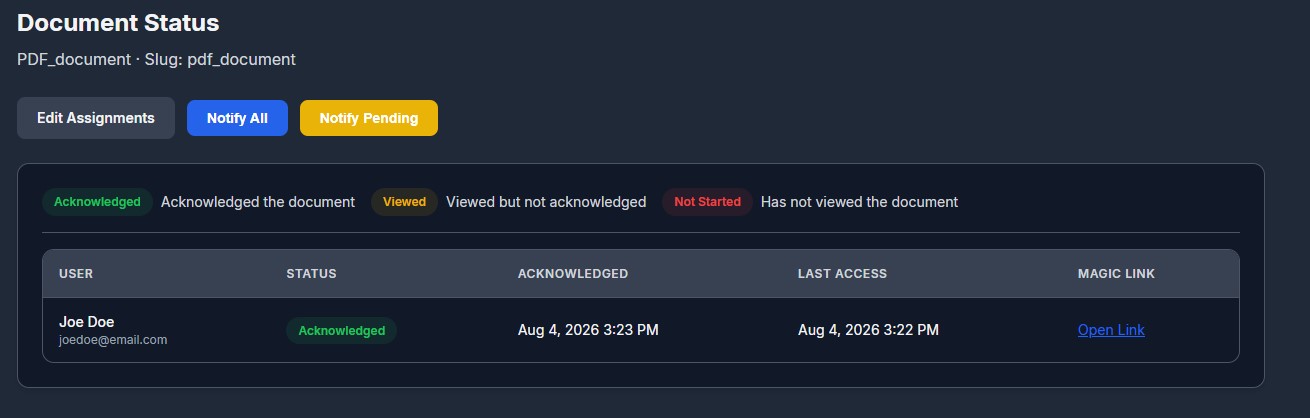
The three states
-
Acknowledged — opened the document and clicked the
ack button. Recorded with a UTC timestamp, plus the IP address and browser user-agent as
evidence.
-
Viewed — opened their link at least once but
hasn't acknowledged yet.
-
Not started — hasn't opened the document at all.
Where to look
The Dashboard and the Documents list show per-document progress
at a glance — how many assigned, how many green / yellow / red, and how many notifications went
out. Each document's Status page breaks it down person by person: who's acked
(and exactly when, from where), who's only peeked, who hasn't started — with the Notify buttons
right there for a targeted nudge.
The daily report
Enable daily_report_enabled (or flip it on in Settings) and every day at
daily_report_time AckMan sends a summary — new acknowledgements since the last
report, plus everything still pending — to every admin by email, and once to each configured chat
channel. The time is a simple HH:MM, or a cron expression if you want something
fancier than daily.
Exporting the records
Everything lives in a plain SQLite database at data/ackman.db, so your records are
never locked in. For a spreadsheet-ready extract of the acknowledgement trail:
sqlite3 data/ackman.db -csv -header \
  "SELECT d.friendly_name, u.name, a.acknowledged_at, a.ip
   FROM acknowledgments a
   JOIN documents d ON d.id = a.document_id
   JOIN users u     ON u.id = a.user_id
   ORDER BY a.acknowledged_at DESC;" > acks.csv
Hand acks.csv to HR, Training, or that one auditor who loves a spreadsheet.
Keeping things tidy
Housekeeping
There are no folders to fuss over — a consistent naming habit goes a long way (e.g.
Policy: Remote Work, Training: Fire Safety 2026). When a document has
run its course, archive it: links stop working and it drops out of the active
lists, but every view and acknowledgement is preserved as evidence under
Admin → Archive. From there you can restore it — or permanently delete it, which
destroys the document and its history, as a deliberate second step. The same applies to
users: removing one archives them, keeping their acknowledgment history intact.
Optionally, allow_public_directory: true makes the home page list document names for
anyone who visits. Opening one still requires a personal link — the directory is a table of
contents, not a back door.
Installation
All platforms
Every build is a single static binary with the web interface, templates, and assets baked in.
Install = put the file somewhere sensible and make sure it starts on boot.
Linux (x86-64) & Raspberry Pi (ARM64)
Grab the matching build (ackman-linux-amd64 for regular servers and VMs,
ackman-linux-arm64 for a Pi running a 64-bit OS), then:
# put it in its own home
sudo mkdir -p /opt/ackman
sudo mv ackman-linux-amd64 /opt/ackman/ackman
sudo chmod +x /opt/ackman/ackman

# take it for a spin
cd /opt/ackman && ./ackman -listen :8080
Ports below 1024 (like the default :80) need extra rights on Linux. Pick one:
run behind a reverse proxy with
-listen :8080 (recommended), or grant the binary the low-port capability:
sudo setcap 'cap_net_bind_service=+ep' /opt/ackman/ackman
Run it as a service (systemd)
So AckMan survives reboots, give it a unit file. Note that
WorkingDirectory matters — that's where config.yaml and the
data/ folder live.
# /etc/systemd/system/ackman.service
[Unit]
Description=AckMan document acknowledgement server
After=network-online.target

[Service]
User=ackman
WorkingDirectory=/opt/ackman
ExecStart=/opt/ackman/ackman -listen :8080
Restart=on-failure

[Install]
WantedBy=multi-user.target
# create a dedicated user, then enable + start
sudo useradd --system --home /opt/ackman --shell /usr/sbin/nologin ackman
sudo chown -R ackman:ackman /opt/ackman
sudo systemctl enable --now ackman

# watch the log (the first-run setup code appears here)
journalctl -u ackman -f
Windows (x64)
Put ackman-windows-x64.exe in its own folder (say C:\AckMan) and
run it — from a terminal the first time, so you can see the setup code.
config.yaml and the data\ folder appear right next to the
executable.
To keep it running after a reboot, create a Task Scheduler task with an
At startup trigger set to "Run whether user is logged on or not", or wrap it as a
proper Windows service with a tool like NSSM or WinSW. If you downloaded a ZIP
distribution instead of the bare executable, extract it and run start.ps1.
Building from source
All you need is Go 1.26 or later:
git clone <ackman-repository-url>
cd ackman
make build          # version-stamped binary in ./bin/ackman
# or, without make:
go build ./cmd/ackman
Command-line flags
| Flag |
What it does |
-config path |
Path to the configuration file. Default: config.yaml in the working
directory.
|
-listen :8080 |
Address and port to listen on. Overrides the config file. Default: :80.
|
-version |
Print the version and exit. |
-reset-admin email |
Reset that admin's password, print a temporary one, and exit — the recovery path when
you're locked out. They must choose a new password at next login.
|
Upgrading
Stop the service, swap the binary for the new one, start it again. Database migrations run
automatically on startup; your config.yaml and data/ folder are
untouched. (Still, take a backup first — it takes ten seconds.)
The configuration file
Reference
Day-to-day options live in the admin Settings page — this section is the
reference for the other two layers: the config.yaml file that sits next to the
binary, and the ACKMAN_* environment variables that override it (handy for
containers). Values saved in Settings are stored in the database and win over the file; clear a
field there to fall back to the file value. AckMan runs fine with no config file at all.
A full config.yaml with everything spelled out (every key is optional):
# where to listen (default :80)
listen_addr: ":8080"

# public URL of this install — used to build the magic links
# in emails; an https base_url also turns on Secure cookies
base_url: "https://ackman.example.com"

# database, uploads, and branding live here (default ./data)
data_dir: "./data"

# list document names on the public home page (default false)
allow_public_directory: false

# email delivery: "mailbear" (recommended, default) or "smtp"
email_provider: "mailbear"
mailbear:
  base_url: "https://your-mailbear-server"
  api_key: "mbr_your_send_scope_key"
  from_address: ""            # blank = the key owner's identity
smtp:
  host: "smtp.example.com"
  port: 587
  username: "notifications@example.com"
  password: "your-password"
  from_address: "AckMan <notifications@example.com>"
  use_tls: true

# chat notifications (optional — create an incoming webhook)
slack_webhook_url: ""
rocketchat_webhook_url: ""

# daily summary of new + pending acks, sent to admins
daily_report_enabled: false
daily_report_time: "09:00"    # HH:MM, or a cron expression

token_ttl_hours: 168          # magic-link lifetime (7 days)
max_upload_size: 52428800     # upload cap in bytes (50 MB)
cookie_secret: ""             # auto-generated on first run
branding_logo: ""             # set via Settings → upload logo
Environment variables
For containerized deployments, the essentials can come from the environment instead of a writable
config file:
| Variable |
Overrides |
ACKMAN_LISTEN_ADDR |
listen_addr |
ACKMAN_BASE_URL |
base_url |
ACKMAN_DATA_DIR |
data_dir |
ACKMAN_COOKIE_SECRET |
cookie_secret — set it so the server doesn't write a generated secret to
config.yaml
|
ACKMAN_TOKEN_TTL_HOURS |
token_ttl_hours |
Setting up email delivery? That's covered step by step in
Quick start → Hook up email delivery — the email_provider,
mailbear:, and smtp: keys above are the file-based way to the same
place.
Branding
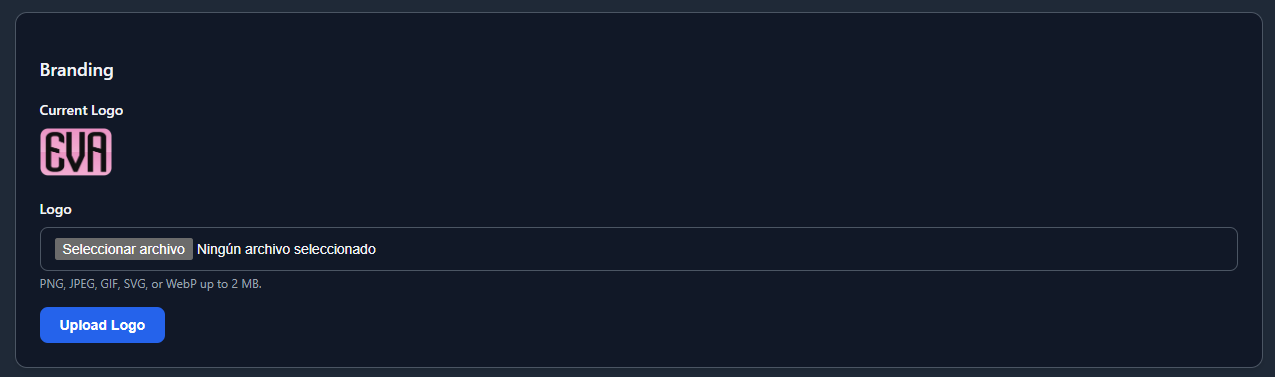
Upload your company logo under Settings (PNG, JPEG, GIF, SVG, or WebP) and it
replaces the default on every page your people see.
Deploying on-premises
Behind the firewall
AckMan was built to live happily on a spare box or a Raspberry Pi inside your network. Documents,
database, and every acknowledgement record stay inside your four walls — the only outbound
connections AckMan ever makes are the notification channels you configure.
The recipe
-
Pick a box. Any always-on machine works: an old desktop, a mini PC, a Pi in
the supply closet. AckMan's footprint is tiny.
-
Give it a stable address. Set a DHCP reservation or static IP, and ideally an
internal DNS name like
ackman.internal.lan so links survive an IP change.
-
Install as a service per the Installation section,
listening on
:8080.
-
Set
base_url to the address people will use — e.g.
http://ackman.internal.lan:8080 — so the magic links in emails point at the right
place.
-
Open the port in the machine's firewall for your LAN, and nothing else. Done.
Optional: a reverse proxy for TLS
If you want https inside the office (nice for the Secure-cookie flag and fewer
browser warnings), put Caddy or nginx in front and let AckMan sit on localhost:
# Caddyfile — Caddy handles certificates, AckMan stays private
ackman.internal.example.com {
  reverse_proxy 127.0.0.1:8080
}
Then set base_url: "https://ackman.internal.example.com" and restart.
Pointing at files you already have
On a LAN, documents don't have to be uploads. A document can be an external link with an
http(s)://, file://, or smb:// target — perfect for the
handbook that already lives on the office NAS. Browsers refuse to open file:// and
smb:// as clickable links, so AckMan shows those as a copyable path instead — and the
view and acknowledgement are recorded all the same.
Deploying to the cloud
Remote-friendly
Distributed team? Stand AckMan up on a small cloud VM and people can read and ack from anywhere.
The smallest instance your provider sells is almost certainly enough.
The recipe
-
Create a VM at your provider of choice and install AckMan as a systemd
service (see Installation), listening on
127.0.0.1:8080 —
local only, never exposed raw to the internet.
-
Point a DNS record — say
ackman.example.com — at the VM's IP.
-
Put a TLS proxy in front. Caddy is the least-fuss option; it fetches and
renews Let's Encrypt certificates automatically:
# Caddyfile
ackman.example.com {
  reverse_proxy 127.0.0.1:8080
}
(nginx + certbot works just as well if that's your house style.)
-
Set the base URL in
config.yaml:
base_url: "https://ackman.example.com". This makes the emailed magic links
absolute and correct, and switches session cookies to Secure.
-
Lock the firewall down to 80/443 (plus your SSH port). AckMan itself is only
reachable through the proxy.
-
Configure email (MailBear or SMTP) — for a remote
team, email is how the links reach people. Slack / Rocket.Chat webhooks work from anywhere
too.
Keeping an eye on it
AckMan exposes a GET /health endpoint that returns JSON with the status and version,
and checks the database is reachable — point your uptime monitor at it.
Security & backups
Serious bit
The acknowledgement log is only worth something if it's protected. Here's what AckMan does on its
own, what's yours to do, and how to make sure the receipts survive a hardware hiccup.
What AckMan handles for you
-
The first admin account requires the one-time setup code printed to the
server console — a fresh install can't be claimed remotely.
-
Admin passwords are hashed with bcrypt; login is timing-safe and rate-limited (10 failed
attempts per 15 minutes per IP).
-
Magic links are signed with HMAC-SHA256 and expire — 7 days by default, tunable via
token_ttl_hours. Expired? Just hit Notify again.
-
All admin forms carry CSRF protection; session cookies are HttpOnly and SameSite=Strict, and
marked Secure when
base_url is https.
-
Uploads are sanitized, size-limited, stored outside the web root with restrictive permissions,
and never served with script-capable content types — an uploaded HTML or SVG file downloads
instead of rendering, so it can't run scripts in AckMan's origin.
-
The database and data directories are created readable only by the service user, and
conservative security headers go out on every response.
-
Chat notifications are deliberately token-free, so a shared channel can never impersonate a
recipient.
Your part of the deal
-
In production, terminate TLS in front of AckMan and set an
https
base_url (see the cloud and
on-prem recipes).
- Run it as a dedicated, non-root user (the systemd unit above does exactly this).
-
Treat
config.yaml as a secret — it holds the cookie secret and possibly mail
credentials. AckMan writes it with owner-only permissions; keep it that way.
-
Remember the archive model: removing a user or document archives it, preserving the
acknowledgment history as evidence. Permanent deletion is a separate, deliberate step in
Admin → Archive — and it takes the history with it.
Backups
Two things to save, both sitting next to the binary: config.yaml and the entire
data/ directory (the SQLite database, uploaded documents in docs/, and
branding). The simplest reliable routine: stop the service, copy the folder, start it again. For a
zero-downtime snapshot, use SQLite's online backup for the database and copy the uploads
alongside:
# nightly snapshot — the server can stay up
sqlite3 /opt/ackman/data/ackman.db ".backup '/backup/ackman-$(date +%F).db'"
cp -r /opt/ackman/data/docs /backup/docs-$(date +%F)
cp /opt/ackman/config.yaml /backup/
Restoring is the mirror image: place config.yaml and the
data/ folder next to the binary on the new machine and start it. Do a test restore
once before you need it — a backup you've never restored is a rumor, not a backup.
Locked out?
If every admin password is lost, recovery requires console access to the server (by design):
./ackman -reset-admin you@company.com
# prints a temporary password; you must choose a new one at next login
FAQ
Q & A
The questions everyone asks, answered by Doc himself.
What exactly counts as an "ack"?
A person opens their personal, cryptographically signed link, sees the document, and clicks
the acknowledge button. AckMan records the moment as a UTC timestamp along with the IP address
and browser user-agent. The record is write-once: clicking again later doesn't move the
original timestamp.
Do my people need accounts or passwords?
No. Only admins log in. Everyone else just clicks the magic link they receive — no
registration, no password resets, no IT tickets.
What file types can I upload?
Any file type, up to 50 MB by default (raise it with max_upload_size). PDFs
and images display right in the browser; file types that could carry scripts (HTML, SVG, and
friends) are delivered as downloads instead, for safety. And if the document already lives
somewhere — a website, an intranet page, a network share — link to it instead of uploading.
How many people can it handle?
More than you'd guess. It's a single compiled binary on an embedded SQLite database — serving
a company's worth of handbook acknowledgements is light work, even on a Raspberry Pi. This is
small-office tooling that scales to hundreds of users without breaking a sweat.
A magic link expired — now what?
Links live for 7 days by default (token_ttl_hours). Just hit
Notify on the document again — ideally scoped to "only pending" — and
everyone who still needs to ack gets a fresh link.
I renamed a document or changed its slug. Are the links I already sent dead?
No. The signed token inside each link identifies the document itself, so old links keep
working and quietly redirect to the new address.
Someone forwarded their personal link. Can a colleague ack for them?
Technically yes — whoever holds the link holds the pen, which is why every ack also records
the IP and browser it came from, why links expire, and why chat notifications deliberately go
out without tokens. Tell your folks to treat their link like a signature stamp: theirs, not
for lending.
I'm locked out of the admin panel.
Run ./ackman -reset-admin you@company.com on the server console. It prints a
temporary password and forces a new one at next login. Console access required — that's a
feature.
Does Doc ever sleep?
He doesn't. Point your uptime monitor at GET /health and you'll see for yourself
— status, version, and a database check, around the clock.
Want to peek under the hood?
The GitHub repo goes public soon — full source, issues, and release notes. Until then, grab a
build and go collect some acks.
GitHub · coming soon